1

What are the redIT Name Servers?

If you have your domain name registered with a different provider but are using redIT for your hosting services you may want to change the Name Servers of your domain to use the redIT Name Servers.

This way if you are using Lets Encrypt to issue you with an SSL Certificate it can all be automated for you and you will not have to make manual changes to your DNS records.

The redIT Name Servers you should be using are:

cp.redithosting.co.uk

name0.redithosting.co.uk

name1.redithosting.co.uk

You will then be able to make changes as needed to your Domains DNS records via the redIT Hosting Control Panel


How to change your Domain DNS settings in WordPress.com to use the redIT Servers

If you have a domain name registered with WordPress.com because you used to have your website hosted with WordPress.com and are now moving to a WordPress.org site you will need to update your Domain DNS records within the WordPress.com system to use the redIT servers.

NOTE: If you are planning to migrate your domain to redIT we would still recommend that you update your DNS settings with WordPress.com first to allow for a seamless migration.

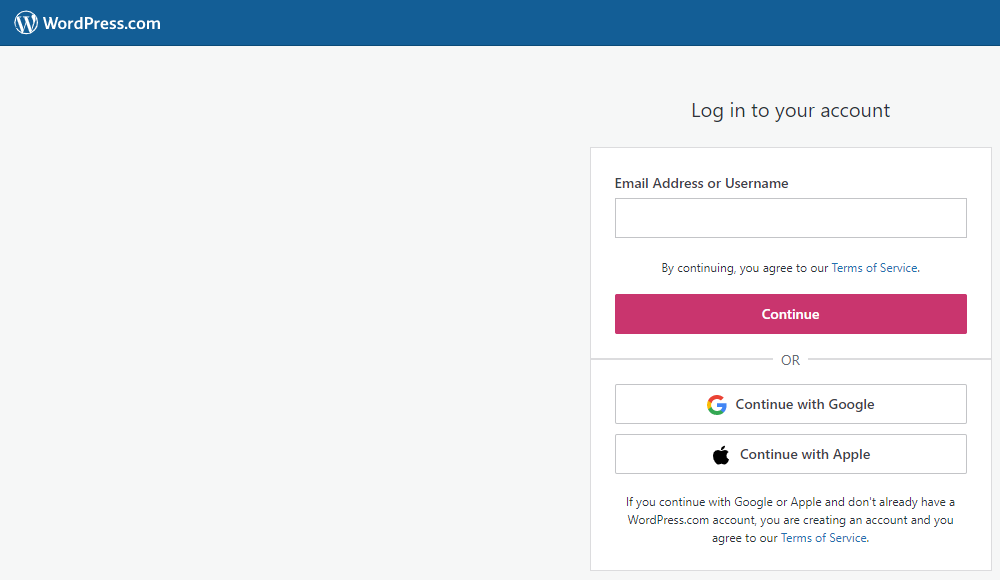
The first step in changing the DNS settings for your domain hosted with WordPress.com is to access your WordPress.com account at https://www.wordpress.com/log-in

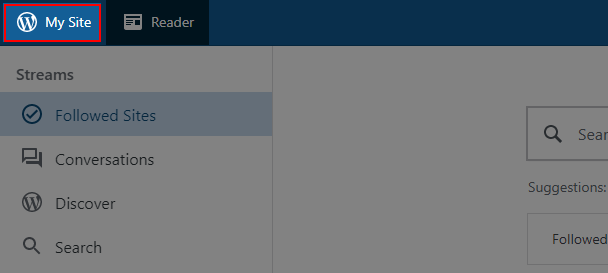
Once you are logged into your WordPress.com account click on the ‘My Site’ button in the top left corner of the dashboard page.

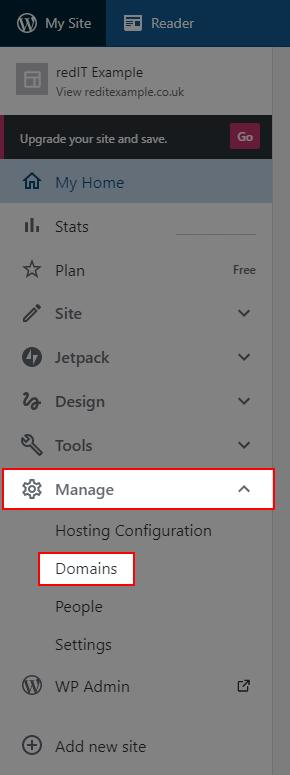
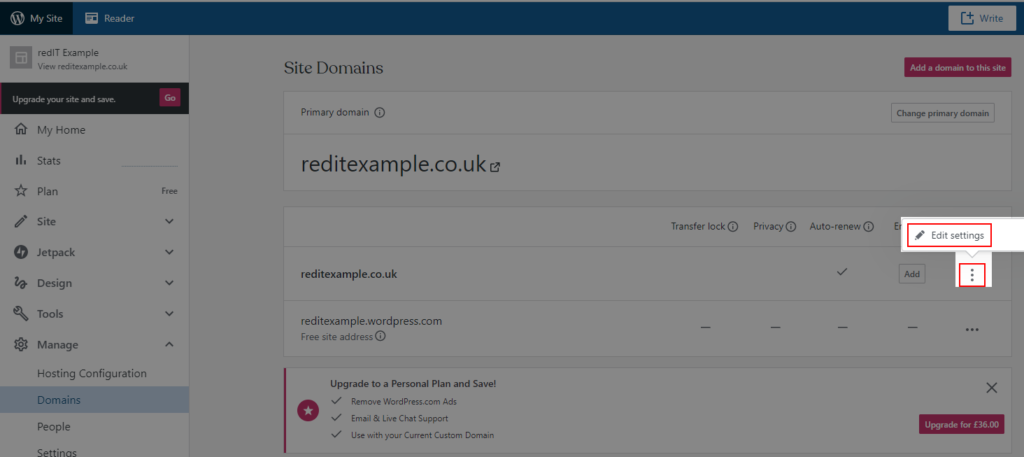
Once the ‘My Site’ menu has loaded click on the ‘Manage’ menu heading and then on the ‘Domains’ menu item.

From within the ‘Site Domains’ page, you should be able to find the domain name for your website that you are looking to update the DNS settings for. At the right of the domain row are three dots click on this and from the menu that opens click on ‘Edit Settings’.

You should now click on the ‘Change your name servers & DNS records’ button from within the middle of the page.

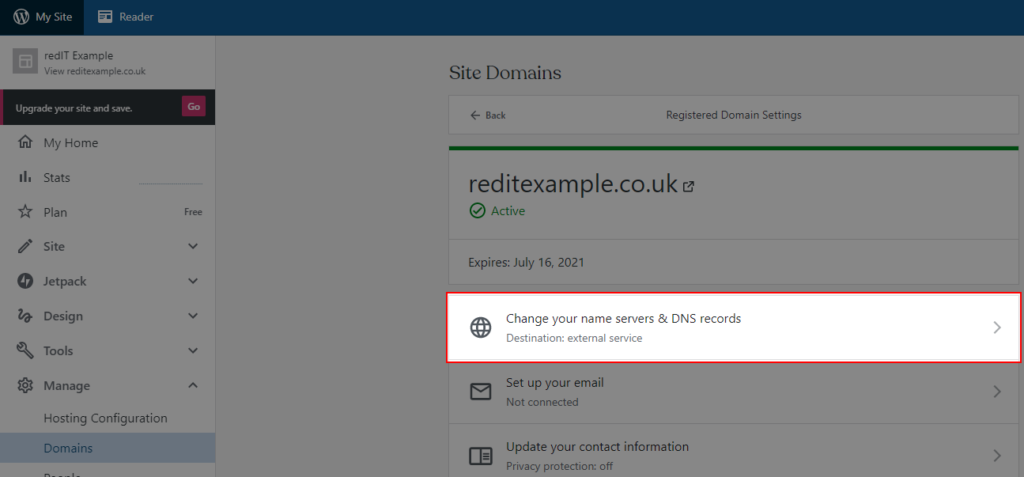
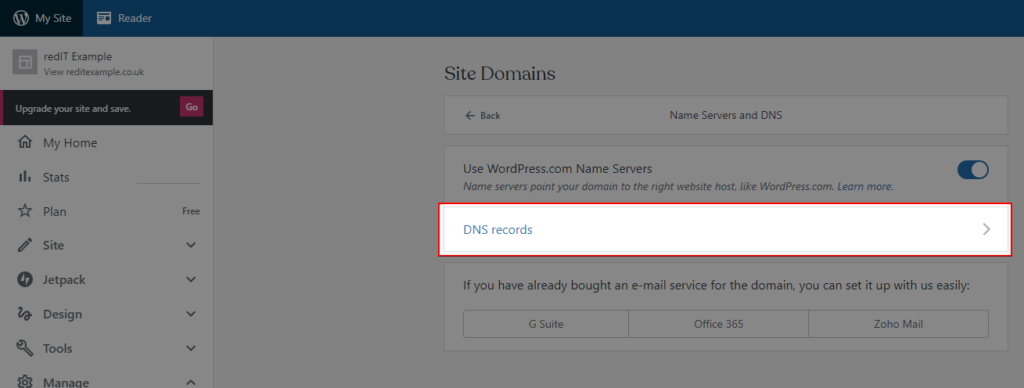
At this stage we are only looking to update the DNS Records for your website so that your WordPress.org version now loads for your visitors. So on the next screen click on the ‘DNS Records’ option.

On the ‘DNS Records’ page, you will need for find any records that are either of the type ‘A’ or ‘CNAME’ that can be deleted.

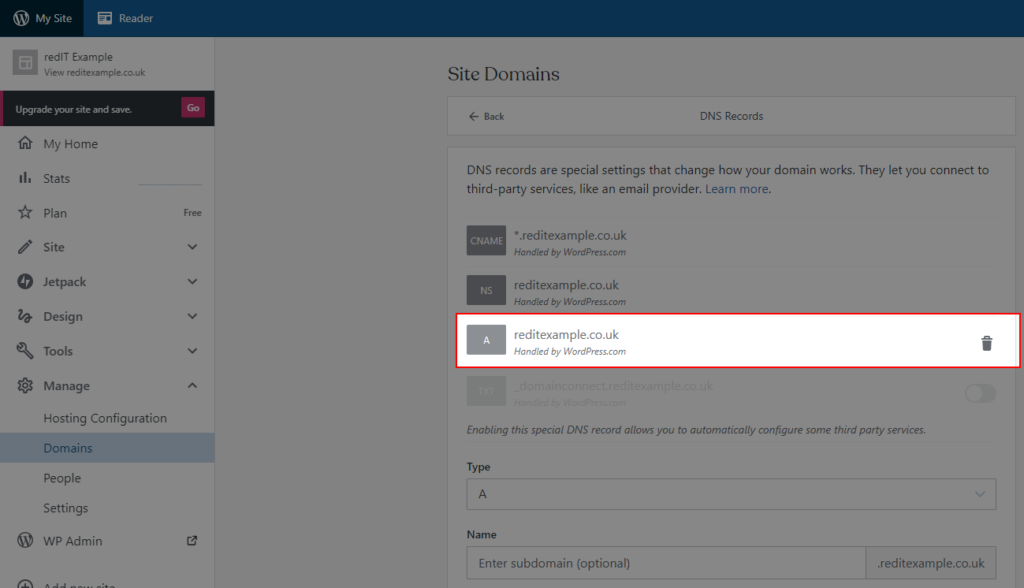
This is done by clicking on the ‘Bin’ icon at the end of the record that you wish to remove.

You will now need to add the new DNS Records into the bottom section of the page to replace the records that have just been removed.

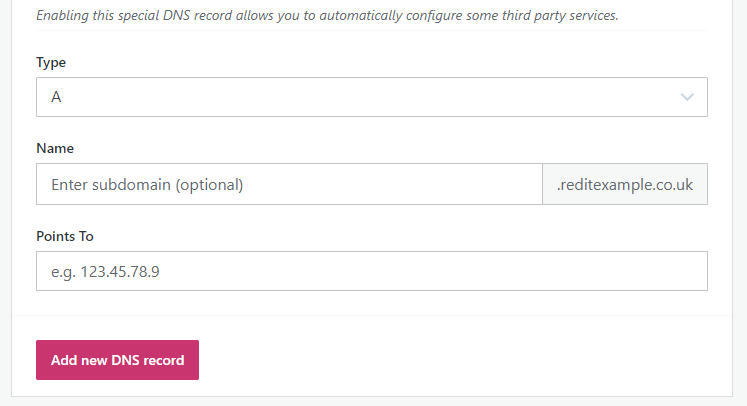
The rules that you will need to add are:

Type Name Points To
A @ The IPv4 Address of your redIT Shared Hosting Web Server
A www The IPv4 Address of your redIT Shared Hosting Web Server
AAAA @ The IPv6 Address of your redIT Shared Hosting Web Server
AAAA www The IPv6 Address of your redIT Shared Hosting Web Server

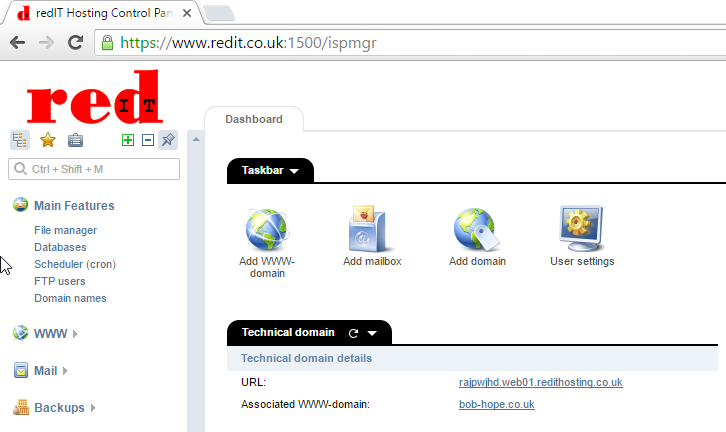
To get the IPv4 and IPv6 addresses you will need to log into the redIT Shared Hosting portal (FAQ Link) and from the left hand menu under the ‘WWW’ menu item click on ‘WWW-domains’

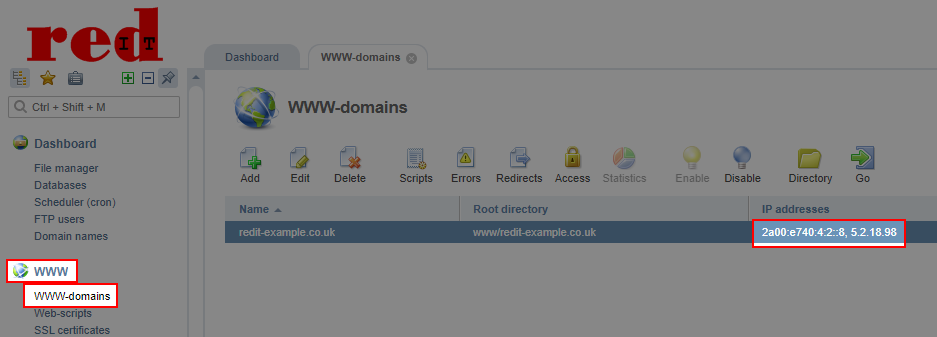
The IPv4 and IPv6 (if enabled) are split by a ‘,’ and the IPv4 address will be all numbers whereas the IPv6 address will be a mix of numbers and lower case letters.

Once you have made these changes to your records via the WordPress.com system you will need to wait for them to be updated globally. You can check these changes via the following site:

https://www.whatsmydns.net/


How to add a Certificate Authority Authorization (CAA) DNS record

What is a Certificate Authority Authorization (CAA) DNS Record?

A Certificate Authority Authorization (CAA) record is a security
measure that allows the domain name owner to specify which Certificate
Authority (CA) is authorized to issue certificates for that domain.
If
a CA receives an order for a certificate for a domain with a CAA record
and that CA isn’t listed as an authorized issuer, they are prohibited
from issuing the certificate to that domain or any subdomain.

Why use a CAA?
SSL Certificate Authoritys are required to check a Domain Names DNS records for a CAA record before issuing an SSL Certificate.
This
gives the benifit of perventing unauthorized issueance of an SSL
Certificate and will help protect your business and your web site from
fraud.

What if I don’t have a CAA Record?
If
you don’t have a CAA Record in your DNS this is the same a saying that
all CA’s may issue a certificate for you and as such we would recommend
adding a CAA Rule.

How Do I Create A CAA Record?
We have found a site that will do most of the work for you.
If you visit https://sslmate.com/caa/ you will be able to enter the details needed.
If for example you wanted to create a CAA record for ‘reditexample.co.uk’ you would enter the domain name into the box in section 1.

Enter your Domain Name

Now if you are looking to create your first CAA record for this domain click on the ‘Auto-Generate Policy’ this will look for any existing SSL Certificates on you domains DNS Records.
If you think you already have a CAA Record and are looking to update the rules you can click on ‘Load Current Policy’
If any SSL Certificates are found they will then be selected in section 2.

CAA - Select Authorized Certificate Authorities

From here you can either select to add additional SSL Certificate providers or remove some of the ones that have been selected for you.   In the next section ‘Section 3’ you can enter an optional eMail address, which will be used if an SSL Certificate is attempted to be issued for your domain that is not on the allowed list.

CAA - Incident Reporting

Finally you will see that in Section 4 is a copy of the DNS Records that you will need to add to your DNS Zone file. Most providers will be able to work with the ‘Generic’ output

If you are using the redIT Shared Hosting Platform or the redIT DNS Service you can add these records through our Hosting Control Panel and once you are logged in select ‘Domain Names’ from the left hand menu:

redIT Control Panel - Domain Names menu

Now from the main control panel page select the domain name that you wish to add the CAA record for and click on the ‘Records’ Icon

redIT Control Panel Domain Records

You should now see a list of all your current DNS Records for the selected Domain Name. To add the new record or records you will need to click on the ‘Add’ button at the top of this page.

redIT Control Panel Add DNS Record

Finally for each of the records that the CAA Wizard has shown you you simply enter the details into the new record form. In this example we have added the first result returned from the Wizard as shown above

redIT Control Panel Add DNS record

If you are adding the eMail record you can change the ‘Tag’ type as needed.


Adding an SPF Record

SPF or Sender Policy Framework is a way of stopping your eMail Domain being used to send ‘spoof’ eMails.

The
SPF can stop a remote web use from sending an eMail claiming to be from
your domain using a forged from address by default new redIT Web and
DNS Hosting accounts have a basic SPF record added which will only allow
eMails from your domain to be sent via our eMail Server which is
associated with your account and the web server you are hosted on.

You can read more about the SPF Project at http://www.openspf.org/

An SPF Record is entered into your DNS Zone file as a Text Record (TXT).

To add or edit your SPF record you will need to log into your redIT Hosting Account. This can be done either Directly at https://cp.redit.co.uk/ or via the main redIT Web Site

If you do not yet know how to access your redIT Hosting Account please read our Knowledgebase Article Logging into your redIT Hosting Account

Once you are logged into your redIT Web Hosting Account, from the left hand menu with ‘Main Features’ expanded select ‘Domain names’

redIT Hosting Control Panel

Select the domain that you wish to alter the SPF Record for and click on the ‘Records’ icon

redIT Hosting Domain Name DNS

If you already have an SPF record in your DNS Zone file it will be shown here, to alter the record select the line with a single left click and the click the ‘Edit’ icon.

redIT Hosting DNS records

Your SPF Record will then be opened for you to alter as detailed below:

redIT Hosting Edit Domain Record

If you do not have an existing SPF record you will need to create one by clicking on the ‘Add’ Icon which will open the ‘Add a new DNS record’ screen.

If you do not have an existing SPF record you will need to create one by clicking on the 'Add' Icon which will open the 'Add a new DNS record' screen.

If you are adding a new DNS SPF Record you will need the following information:
Name – * (The asterisk character normally found on the number 8 key)
TTL – This can be left at 3600 (1 hour)
Type – Change this to “TXT (text Record)”
Value – This is where you enter your SFP Record value as detailed below.

In any SPF record it must start with “v=spf1” followed by the type of rules that you wish to allow or reject then ending with one of the four “all” qualifiers.
Aas a basic starting point we would recommend the following rule set:

v=spf1 a mx -all

This rule will allow eMails to be send by any server that has an ‘A’ record listed in your DNS Zone file along with and MX Records (eMail Servers) the “-all” should reject any other eMail that is not send from a server associated with your DNS Zone file, this is a good starting point as it will allow you to send eMails from both your known eMail servers and your website.

You can of course expand on this rule set and our Support Team are more than happy to help.


Virtual Private Server (VPS) Reverse DNS (rDNS)

Please Note: We can not change rDNS on our Shared Web Hosting Platform.

When
you order a Virtual Private Server (VPS) with redIT you will be given
an IPv4 Address and a IPv6 Address Range (a /112 block).

By default these address will have the Reverse DNS Entry set to something like:
spare-000-000.redithosting.co.uk

If you need to change the Reverse DNS (rDNS) entry for either of you IPv4 or IPv6 Address you will need to Open a Ticket
under the DNS Support department stating both the IP Address that you
would like to change and what you would like to change the record too.

For example:

192.168.1.1  to  example.com

Our network team will then check your records and update the DNS Zone file as needed or contact you to confirm your request.

More information about rDNS can be found at:
Wikipedia